Flutter
- project structure in split packages
- To run the project first activate
melos
dart pub global activate melos
- Then run this commend in the root of the project
melos bs
- this code will run pub get for you in all packages

- we have the following
- apps (
super_up_admin) this is the admin panel - apps (
super_up_app) this app you should run it - packages all needed packages the most important packages is the
super_up_corethes_constants.dartin thelib/src
Lest explain packages
s_translatecontains all arb files forsuper_up_app,super_up_adminprojectssuper_up_corecontains all logic for super up app itself like shared http requests,utils,widgets (DONT UPDATE)v_chat_firebasecontains the firebase FCM only logic (DONT UPDATE)v_chat_input_uithis contains the ui and logic for the message input (recorder,file selector,location picker)
v_chat_media_editorthis contains the ui of media editor
v_chat_message_pagethis contains theui & logicof message page
v_chat_room_pagethis contains theui & logicof chat page
v_chat_sdk_corecontains all logic for v_chat app itself like shared http requests, socket,notifications (DONT UPDATE)
Change app name,package,logo
- each app must have
uniquepackage name so you must change it! to be accepted in the stores - this step should be done first before connect firebase
- we will use this package rename
- install by
flutter pub global activate rename - to change package name
flutter pub global run rename --bundleId com.vchatsdk.vnotestarterExample =>pub global run rename --bundleId com.XXXXXXX.XXXXXX - to rename the app use
flutter pub global run rename --appname "YOUR APP NAME" - to update logo just update the
logo.pngin assets folder the logo must be.png - then run the code in the super_up_app
flutter pub run flutter_launcher_icons:main - then this command
dart run flutter_native_splash:create
Full environment setup (Android/iOS/Web/macOS/Windows)
Prerequisites
- Flutter SDK 3.29+ (or as stated in
intro.md) withflutter doctorall green - Android Studio with Android SDK platforms 34+, NDK, and platform tools
- Xcode (for iOS/macOS) with command-line tools, CocoaPods
sudo gem install cocoapods - Java 17 (recommended; set
JAVA_HOME) - Melos installed and bootstrapped as above
Android setup
- Create signing key (for Play release):
keytool -genkey -v -keystore ~/superup.keystore -alias superup -keyalg RSA -keysize 2048 -validity 10000
Place keystore at
apps/super_up_app/android/app/superup.keystore.Create
apps/super_up_app/android/key.properties:
storePassword=CHANGE_ME
keyPassword=CHANGE_ME
keyAlias=superup
storeFile=superup.keystore
- Build:
flutter build apk --split-per-abi
flutter build appbundle
iOS setup
- Update bundle identifier via the
renametool as described - Open
ios/Runner.xcworkspacein Xcode, set signing team, automatic signing - Update
Info.plistfor AdMob Google Ads App ID and any permissions (camera, mic, location) - Build:
flutter build ipa --export-options-plist=ExportOptions.plist
Web setup
- For best compatibility use HTML renderer:
flutter build web --release --web-renderer html
macOS/Windows
flutter config --enable-macos-desktop --enable-windows-desktop
flutter build macos
flutter build windows
Connect firebase
- Recommend to user firebase flutter CLI which its new tool to make the firebase base connect straightforward
- android
- ios
- You can connect it easily be firebase follow up this video
- CLI tool
Firebase configuration details
- Android: ensure
google-services.jsoninandroid/app/ - iOS: ensure
GoogleService-Info.plistinios/Runner/ - Add Firebase Messaging to receive pushes; on iOS enable Push + Background Modes
- If using APNs key, complete steps in Notifications section below
SConstants
- This file inside packages in [super_up_core] in
lib/src/s_constants.dart - This file contains the configuration of the app
abstract class SConstants {
  ///your super up base domain url
  ///like this (example.com) not start https// or any sub domains example [superupdev.com] or server ip with port like [12.xxx.xxx:80]
  /// case of you use server ip just put the server ip connected to the port [http://ip:port]
  static const _productionBaseUrl = "superupdev.online";

  ///your app name
  static const appName = "Superup";

  ///android and ios admob ids [https://developers.google.com/admob/flutter/quick-start] [https://developers.google.com/ad-manager/mobile-ads-sdk/flutter/quick-start]
  static const androidAdUnitId = "ca-app-pub-3940256099942544/6300978111";
  static const iosAdUnitId = "ca-app-pub-3940256099942544/2934735716";

  ///setup video and voice calls [https://agora.io]
  static const agoraAppId = "------------------------";

  ///change this to your google maps api key to enable google maps location picker
  static const googleMapsApiKey = "AIzaSyAP---------------------";

  ///update this url to share the app for others
  static const googlePlayUrl =
      "https://play.google.com/store/apps/details?id=com.app.superup";
  static const appleStoreUrl = "https://testflight.apple.com/join/F4tAbW5J";

  ///get the onesignal id for push notifications [https://onesignal.com]
  static const oneSignalAppId = "********-****-****-****-**************";

  ///don't update update only if you use server ip just return your server ip with port [12.xxx.xxx:80/]
  static String get baseMediaUrl {
    ///if you dont setup domain yet you can return the server ip like this [return Uri.parse("http://ip:port/");]
    return "https://api.$_productionBaseUrl/";
  }

  ///don't update update only if you use server ip just return your server ip with port [12.xxx.xxx:80/api/v1]
  static Uri get sApiBaseUrl {
    ///if you dont setup domain yet you can return the server ip like this [return Uri.parse("http://ip:port/api/v1");]
    return Uri.parse("https://api.$_productionBaseUrl/api/v1");
  }
}
CORS/Domain considerations
- Set
_productionBaseUrlto your apex domain, e.g.,example.com - Backend must be available on
https://api.example.com - If testing via IP/port, temporarily set
baseMediaUrlandsApiBaseUrltohttp://IP:PORT/andhttp://IP:PORT/api/v1
Add more language
- You can add new language by just open the [s_translation] package
- And inside
lib/i18ncreate new file its name should follow the - Standard of
intl_short language code.arb.arb - Inside this file copy the
intl_en.arband translate only the values and dont touch the key of the map - Then, while you run the app, the new language will be added, and it will appears in the selections
Ads
- get the ids from these urls get banner id for ios and android
- android and ios admob ids quick-start mobile-ads-sdk
- dont forget to update the android add the ads app Id
android/app/src/main/AndroidManifest.xml - and for ios open
ios/Runder/info.plistupdate the<key>GADApplicationIdentifier</key>
<string>Your app id</string> APPLICATION_IDnot unit id becareful
<meta-data
        android:name="com.google.android.gms.ads.APPLICATION_ID"
        android:value="ca-app-pub-YOUR KEY HERE!"/>
- put your android appId for ads here
android:value= - for Ios update the
ios/Runner/Info.plist <key>GADApplicationIdentifier</key>
<string>ca-app-pub-YOUR KEY HERE!</string>
Agora.io
- Create agora app and enable it copy the
appIdand enable - Setup video and voice calls agora
Static const agoraAppId = "------------------------";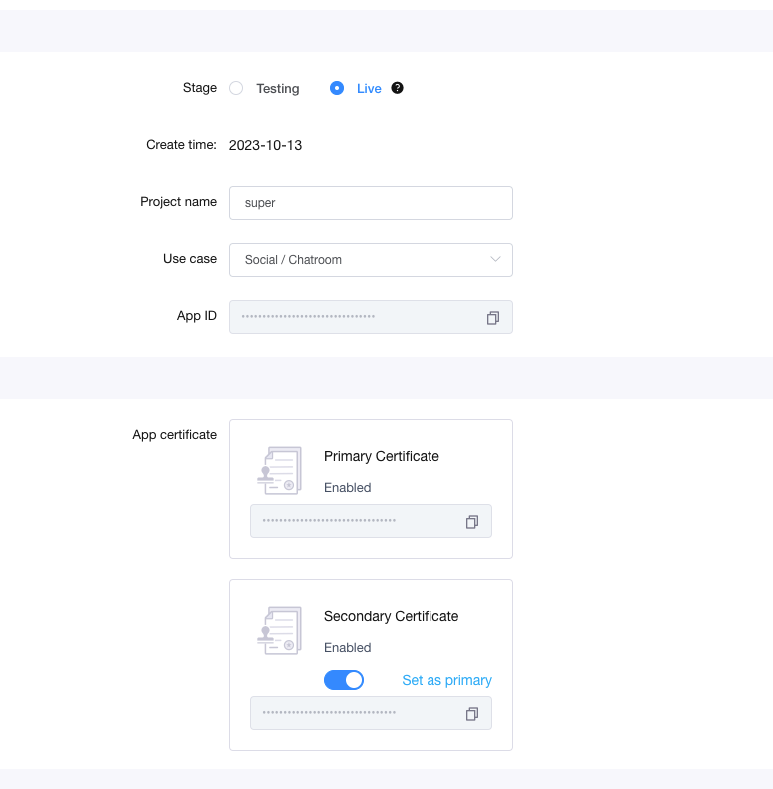
- enable the
Secondary Certificate
Google api key
- Get google api key and enable all options like
searchandGEOlocations for android and ios - Don't forget to update the android
android/app/src/main/AndroidManifest.xml
<meta-data
        android:name="com.google.android.geo.API_KEY"
        android:value="YOUR API_KEY HERE!"/>
- and for ios
ios/Runner/AppDelegate.swift- GMSServices.provideAPIKey(
YOUR API_KEY HERE!)
Notifications iOS (APNS) AND VOIP
Login to your Apple Developer Account,(if you don’t have, you need to create one to be able to test, publish ios app).
Navigate to
Certificates, Identifiers & Profiles > Keys >Add New from the left menu.
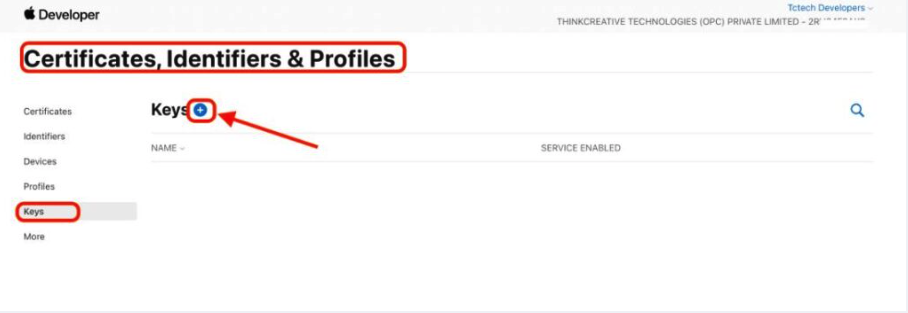
- Register a New key.
- Set the key name as
FirebaseAPNS. - Tick “Apple Push Notification Services (APNs)”
- Click Continue to register it.

- Once the key is registered follow below steps:
- Copy the Team ID (keep it aside)
- Download the Auth key File (keep it aside)
- Copy the Key ID (keep it aside)
- Click “Done” to complete.

- Open Firebase Dashboard > Project Settings
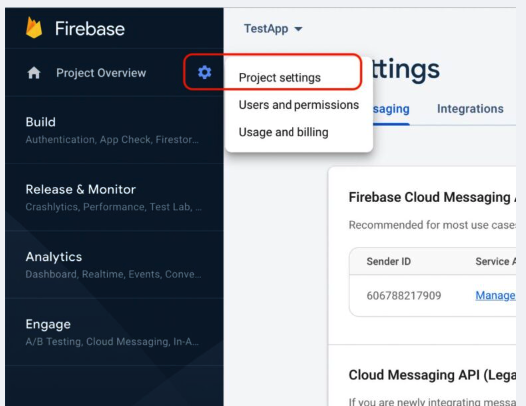
- Click on “Cloud Messaging” tab. For the iOS app, click “Upload”.

- Click on “Browse” to upload the recently downloaded Auth key file.
- Paste the Key ID
- Paste the Team ID
- Click upload to register it.

- VOIP ios setup This key you have downloaded you need to put the content of it to the backend code at the file
AuthKey.p8it containsXXXXjust replace all content with the new one you have - All done now with ios
notifications
iOS Background modes & capabilities
- Enable: Background fetch, Remote notifications, Audio/VoIP if using calls
- Add
Push Notificationscapability - For VoIP, ensure backend token generation and incoming push payloads are correct
how to update theme
- For
darktheme use it already inside themain.dartjust update itdont delete it! - Of course you can update the theme direct from the code if you have much experience
First message page
darkTheme: ThemeData(
          extensions: [
            VMessageTheme.dark().copyWith(
            ///see  options!
            ),
          ],
        ),
- for
lighttheme use
   theme: ThemeData(
            extensions: [
                 VMessageTheme.dark().copyWith(
                   ///see options!
            ),
            ],
          ),
second Chats Room page
- for
darktheme use
darkTheme: ThemeData(
          extensions: [
            VRoomTheme.light().copyWith(
              ///see  options!

              ),
          ],
        ),
- for
lighttheme use
   theme: ThemeData(
            extensions: [
            VRoomTheme.light().copyWith(
              ///see options!

              ),
            ],
          ),
one signal
- Get the onesignal id for push notifications [https://onesignal.com] see flutter docs
- then in
apps/super_up_app/lib/v_chat_v2/v_chat_config.dartenable OneSignal push by add thisconstructor - don't forget to update the app id in
SConstants.oneSignalAppId
      vPush: VPush(
        enableVForegroundNotification: true,
        vPushConfig: const VLocalNotificationPushConfig(),
        ///if you support fcm push notifications
        fcmProvider: VChatFcmProver(),
        ///if you support OneSignal push notifications **THIS**
        oneSignalProvider: VChatOneSignalProver(
          appId: SConstants.oneSignalAppId,
        ),
      ),
:::fin If firebase is available into your country its recommended to use it for notifications push which its 100% free service with no limits! :::
Admin panel
- super up introduce admin panel to control the app
- there are two types of login admin login and viewer login
- you will have two passwords for the admin one for admin another for viewer
- admin can do anything viewer can only see the data he cant edit it
- you can set the password for admin and viewer from the
.env.productionfile in the backend files this file is hidden#Admin panel passwords be carfaul ControlPanelAdminPassword= "xxxxxxxxxxxxx" # put strong password for admin who can edit and update any thing in the app ControlPanelAdminPasswordViewer= "xxxxxxxxxx-xxxx" # put strong password for admin that can only read(see ,users data,chats data etc...) he cannot update any thing - You can change it any tine you want to re deploy your app!
publish
- open terminal inside the
super_up_appfolder
- for android, you can run
flutter build apk --split-per-abifor store publish - for web, you can run
flutter build web --web-renderer htmlsee backend section for how to upload - for ios, you can run ios
Store readiness checklist
- Unique app name and bundle identifiers (Android package, iOS bundle id)
- App icons and splash (launcher icons, native splash)
- Privacy policy hosted at
https://api.<domain>/privacy-policy.html - Working push notifications (keys configured)
- Release signing (keystore and Apple certificates/profiles)
- Versioning and changelog
Doesn't update any package version unless you know what to do